
Overnight Oats – HMR Decision Free Portable Breakfast!
It’s been a short stint since I’ve posted (despite having dozens of things I want to share!) – but since I’m up past my bedtime watching election results, I thought I’d share something quick and easy I’ve been enjoying during this stressful time of year (end of the school year is crazy for teachers!).
You can switch up the flavor of pudding, but I like the cheesecake flavor combined with the thick texture of the overnight oats – awesome for breakfast but would also make a great last meal of the night!
HMR Diet Overnight Oats
- 1 HMR Multigrain Cereal
- 1 tablespoon fat-free, sugar-free cheesecake flavored pudding mix powder
- 1 cup water
I mix everything up using a fork (to prevent clumps of powder) in a portable container with a lid. Put in the fridge overnight. The oats and pudding mix absorb the liquid and create a thick, almost solid, oatmeal. Perfect for the post-morning workout meal and easy to transport (I’ve been eating it on my walking commute this week).
You can play with the amount of liquid to get the texture you want. I like it thick and rich, so one cup of water is perfect. And yes, I eat this cold – I have never tried to heat it after soaking it all night.
Beet & Bean Burgers – Camping on HMR Healthy Solutions

This weekend I am stepping out of my comfort zone and going to a weekend trail-running festival. I’ll be attending alone, and will be surrounded by a community of runners. I am a ball of nervous excitement with dashes of social anxiety.
It will also mean a lot of calories being torched as we run 14ish miles with 2700+ feet of elevation gained, in addition we will do yoga and hiking. But the festival provides food all weekend, most of which is outside of my HMR Healthy Solutions Box.
My box is my safety net. And to reduce my anxiety, to settle my nerves, I did a lot of meal preparation and recipe testing. This is what I plan to enjoy when the menu is burgers on Saturday night!
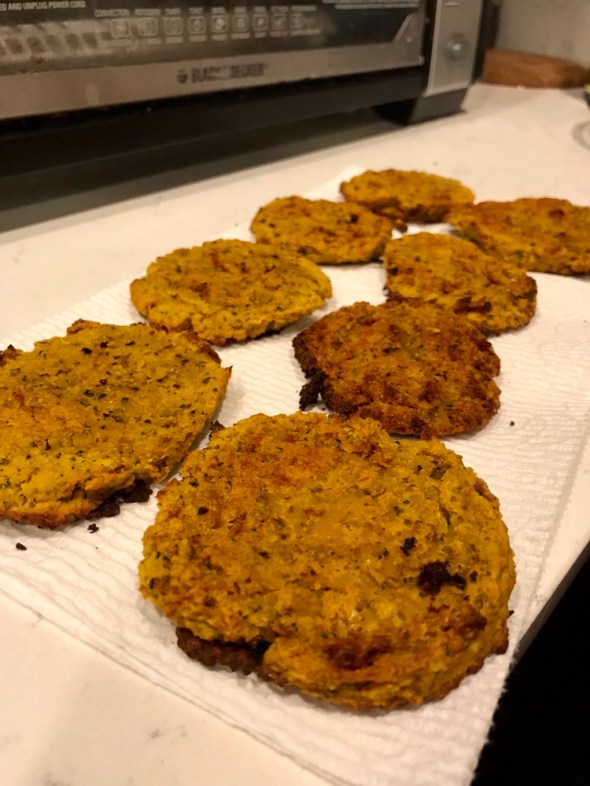
I read several dozen recipes to create this Healthy Solutions Beet & Bean burger that is delicious but is also transportable and can be tossed on a grill or eaten cold.
I made it earlier this week and grilled up some of the patties after refrigerating them overnight. Then I topped them with fresh basil and chopped tomato to create bruschetta burgers!

I make smaller slider patties because they cook quicker and can be easily eaten with a lettuce “bun” – I haven’t tried full size patties but will warn you may want to lower the temperature in the oven and cook significantly longer to allow the burger to cook through (otherwise it will be soggy in the middle).
You will find photo step-by-step below. Also note you could sub out a different beet. Might change up the color and flavor a bit but I know beets can vary region to region.
Beet & Bean Burgers
- 2 medium-large golden beets pre-roasted (I just wrapped them in foil and baked them earlier in the week when roasting vegetables) and cooled
- 1 cup garbanzo beans
- 3 tablespoons aquafaba (the liquid from the canned garbanzo beans)
- 1 tablespoon Pasta Sprinkles (you can use a general Italian seasoning – I happen to love this blend of herbs and garlic – just avoid blends with added salt – the soup is salty enough)
- 1 HMR Chicken Soup
Preheat oven to 375.
Using a food processor, grind up beets and beans into a coarse riced texture. Scrape down sides. Add pasta sprinkles seasoning and aquafaba.
Process for several more minutes until you have a paste-like substance. Then scoop out into patties on a cookie sheet covered with a silicone mat or parchment paper, sprayed with a small light cooking spray mist (I use a biscuit circle to create the shape – but it’s not necessary).
Bake for 25 minutes. Flip over (be careful they are still soft!). Bake for an additional 25 minutes. Remove and let cool on a rack or paper towel.

Traveling on the #HMRDiet – Healthy Solutions Style!
When I was on the medically-supervised HMR Diet Program (Decision-Free), I traveled 20+ weekends a year for work. And I blogged about it. I even traveled to Disney World and stayed in the box!
However as I am working to make vegetables and fruit the major portion of my diet, I realized I would need a new approach to traveling on the HMR Diet Healthy Solutions program. So I spent several weeks thinking about this, not only because I knew I would be traveling in March, but also because I needed to find a way to manage my weight during the long summers I teach at residential programs away from home, where I don’t have a kitchen and live in a dorm.
This weekend was the first test of traveling in the box and I wanted to document what I did so I can reflect on it in the future (and maybe help others out too).
I should also add that this week’s homework assignment for our Phase One class was to eat one more entree that our previous highest entree total for a day. In the first week in Phase One in January, I had two days where I ate 5 entrees (and still lost!), so I had to pick my most challenging day and eat six entrees. I’ll write more about that later but I do have to give a special shoutout because it meant I had to pack even more entrees for a three day trip than I had planned, but it actually served to be a very useful tool I might have otherwise not considered because I *didn’t* want to pack tons of extra entrees!

So what did I pack for my 3 day trip?
Food:
- A minimum of 3 entrees for each day of travel (well in this case I packed 13 instead of 9 because I had that special assignment) – most of these needed to be entrees I could eat cold in case plans changed (although I did have a microwave at the hotel and my HotLogic Mini packed). I may switch this to having 4 a day on hand after my experiences this weekend – front-loading with a double-entree for example really made the day a lot easier!
- 6 packets each of chocolate and vanilla 800s (they travel easier than the 120s)
- 2 packets of 70s for emergency pudding
- 2 batches of pudding cookies (divided into 4 snack size bags equivalent to 1 shake each)
- 3 benefit bars for emergency treats
- 4 pieces of fruit pre-washed that stand up to the jostling in my backpack
- 1 carton of blueberries with 1-cup snack bags packed to divided up upon arriving at the hotel (the fact the snack bags have measurements on the side make it easy for portion control!)
- 15 1-cup baggies of vegetables pre-washed and sliced that could be eaten alone or used as chips to eat the lentil and bean entrees
- Jicama
- Cucumber
- Carrots
- Celery
- Snap Peas
- 1 diet soda can (stored in my BlenderBottle) for an emergency mix-in
Equipment (don’t worry, I don’t use affiliate links! just sharing where I bought them):
- eBags Crew Cooler – after a lot of research, I settled on this bag with a removable liner. The top portion is where I store tools, the front pouch is condiments and my food journal, the side pockets for bottles (they zip up when not in use), and the main compartment for food. It looks professional, has a loop in back to slip over a roller suitcase, and has an easy to carry shoulder strap.
- HotLogic Mini – this fits easily in the top pouch of the cooler and is perfect for heating up food while I am in meetings (and in case the hotel didn’t have a microwave).
- BlenderBottle – Easy to use and clean, I picked one that matched my cooler.
- Bottle Brush for cleaning the shaker bottle.
- Travel cutlery for easy dining.
- AeroLatte Travel Frother – perfect for mixing hot shakes (and soups when I take them)
- Extra quart-sized ziplock bags. I actually also had travel ice blocks for this trip because we weren’t flying. But I keep extra ziplock bags to make ice packs on the road – getting ice from the hotel or a restaurant – to keep things cold.
I have also successfully purchased fruits and veggies at local spots, like having a bowl of fruit when taking my students for ice cream. But I didn’t want to rely on those options being available.
And yes, I will most likely have food left at the end of the trip. My students and coworkers also enjoyed munching on some of my vegetables when they were hungry so packing more was a great idea!
I won’t get home from my trip until this evening, but so far so good. I have survived a pizza party, an ice cream social, and a number of other temptations. And I haven’t suffered any anxiety about making a decision or not having options when I am hungry. I’ve met my minimums (and then some) and I have rather easily stayed in the box!
Toffee Apple Cider – a warming HMR shake on a cold day!
The weather has turned colder in sunny California and that means more hot HMR shakes to stay warm and full during the holiday season.
This one is easy and perfect to sip from a thermos while heading out in the evening to see holiday lights.
Toffee Apple Cider
- 1 ounce Torani Sugar-Free English Toffee syrup
- 1 packet Alpine-Spiced Sugar-Free Apple Cider mix
- 1 serving HMR Diet Vanilla Shake
- 15 ounces hot water
Put everything in the blender and blend on low to help everything dissolve and come together (always be careful blending hot liquids). Pour into a large mug or thermos for a warm and filling beverage!
Pumpkin Spice Tea Latte – An #HMRProgram #DecisionFree Recipe
Pumpkin spice is EVERYWHERE – seriously I must have seen at least ten different brands of pumpkin spiced tea in my local shops. But I finally caved and bought a box because I wanted to mix things up and my other dessert teas were running low.
I realized today after making a tea latte, that I had never posted about these before. But it’s a great alternative to coffee while giving you a warm shake any time of day. I make tea lattes with all sorts of flavored teas but this week have been enjoying a little something extra with the addition of pumpkin spice seasoning added to my shake.
Pumpkin Spice Tea Latte
- Pumpkin Spice Tea (I used the Sprouts Grocery brand black tea)
- Vanilla HMR Shake
- Pumpkin Spice blend (you can find this in most baking aisles)
Boil 14 ounces of water and then brew tea. You can double the bags or reduce the water if you want the flavor extra strong, but I don’t think it’s needed. Once the tea has brewed, add it to your blender with the vanilla shake and a dash of pumpkin pie spice. Blend to froth (you can also use a travel milk brother if you are on the road). Pour back into your mug and top with a half-dash of spice. Enjoy! SUPER easy and perfect for sipping during your morning commute.
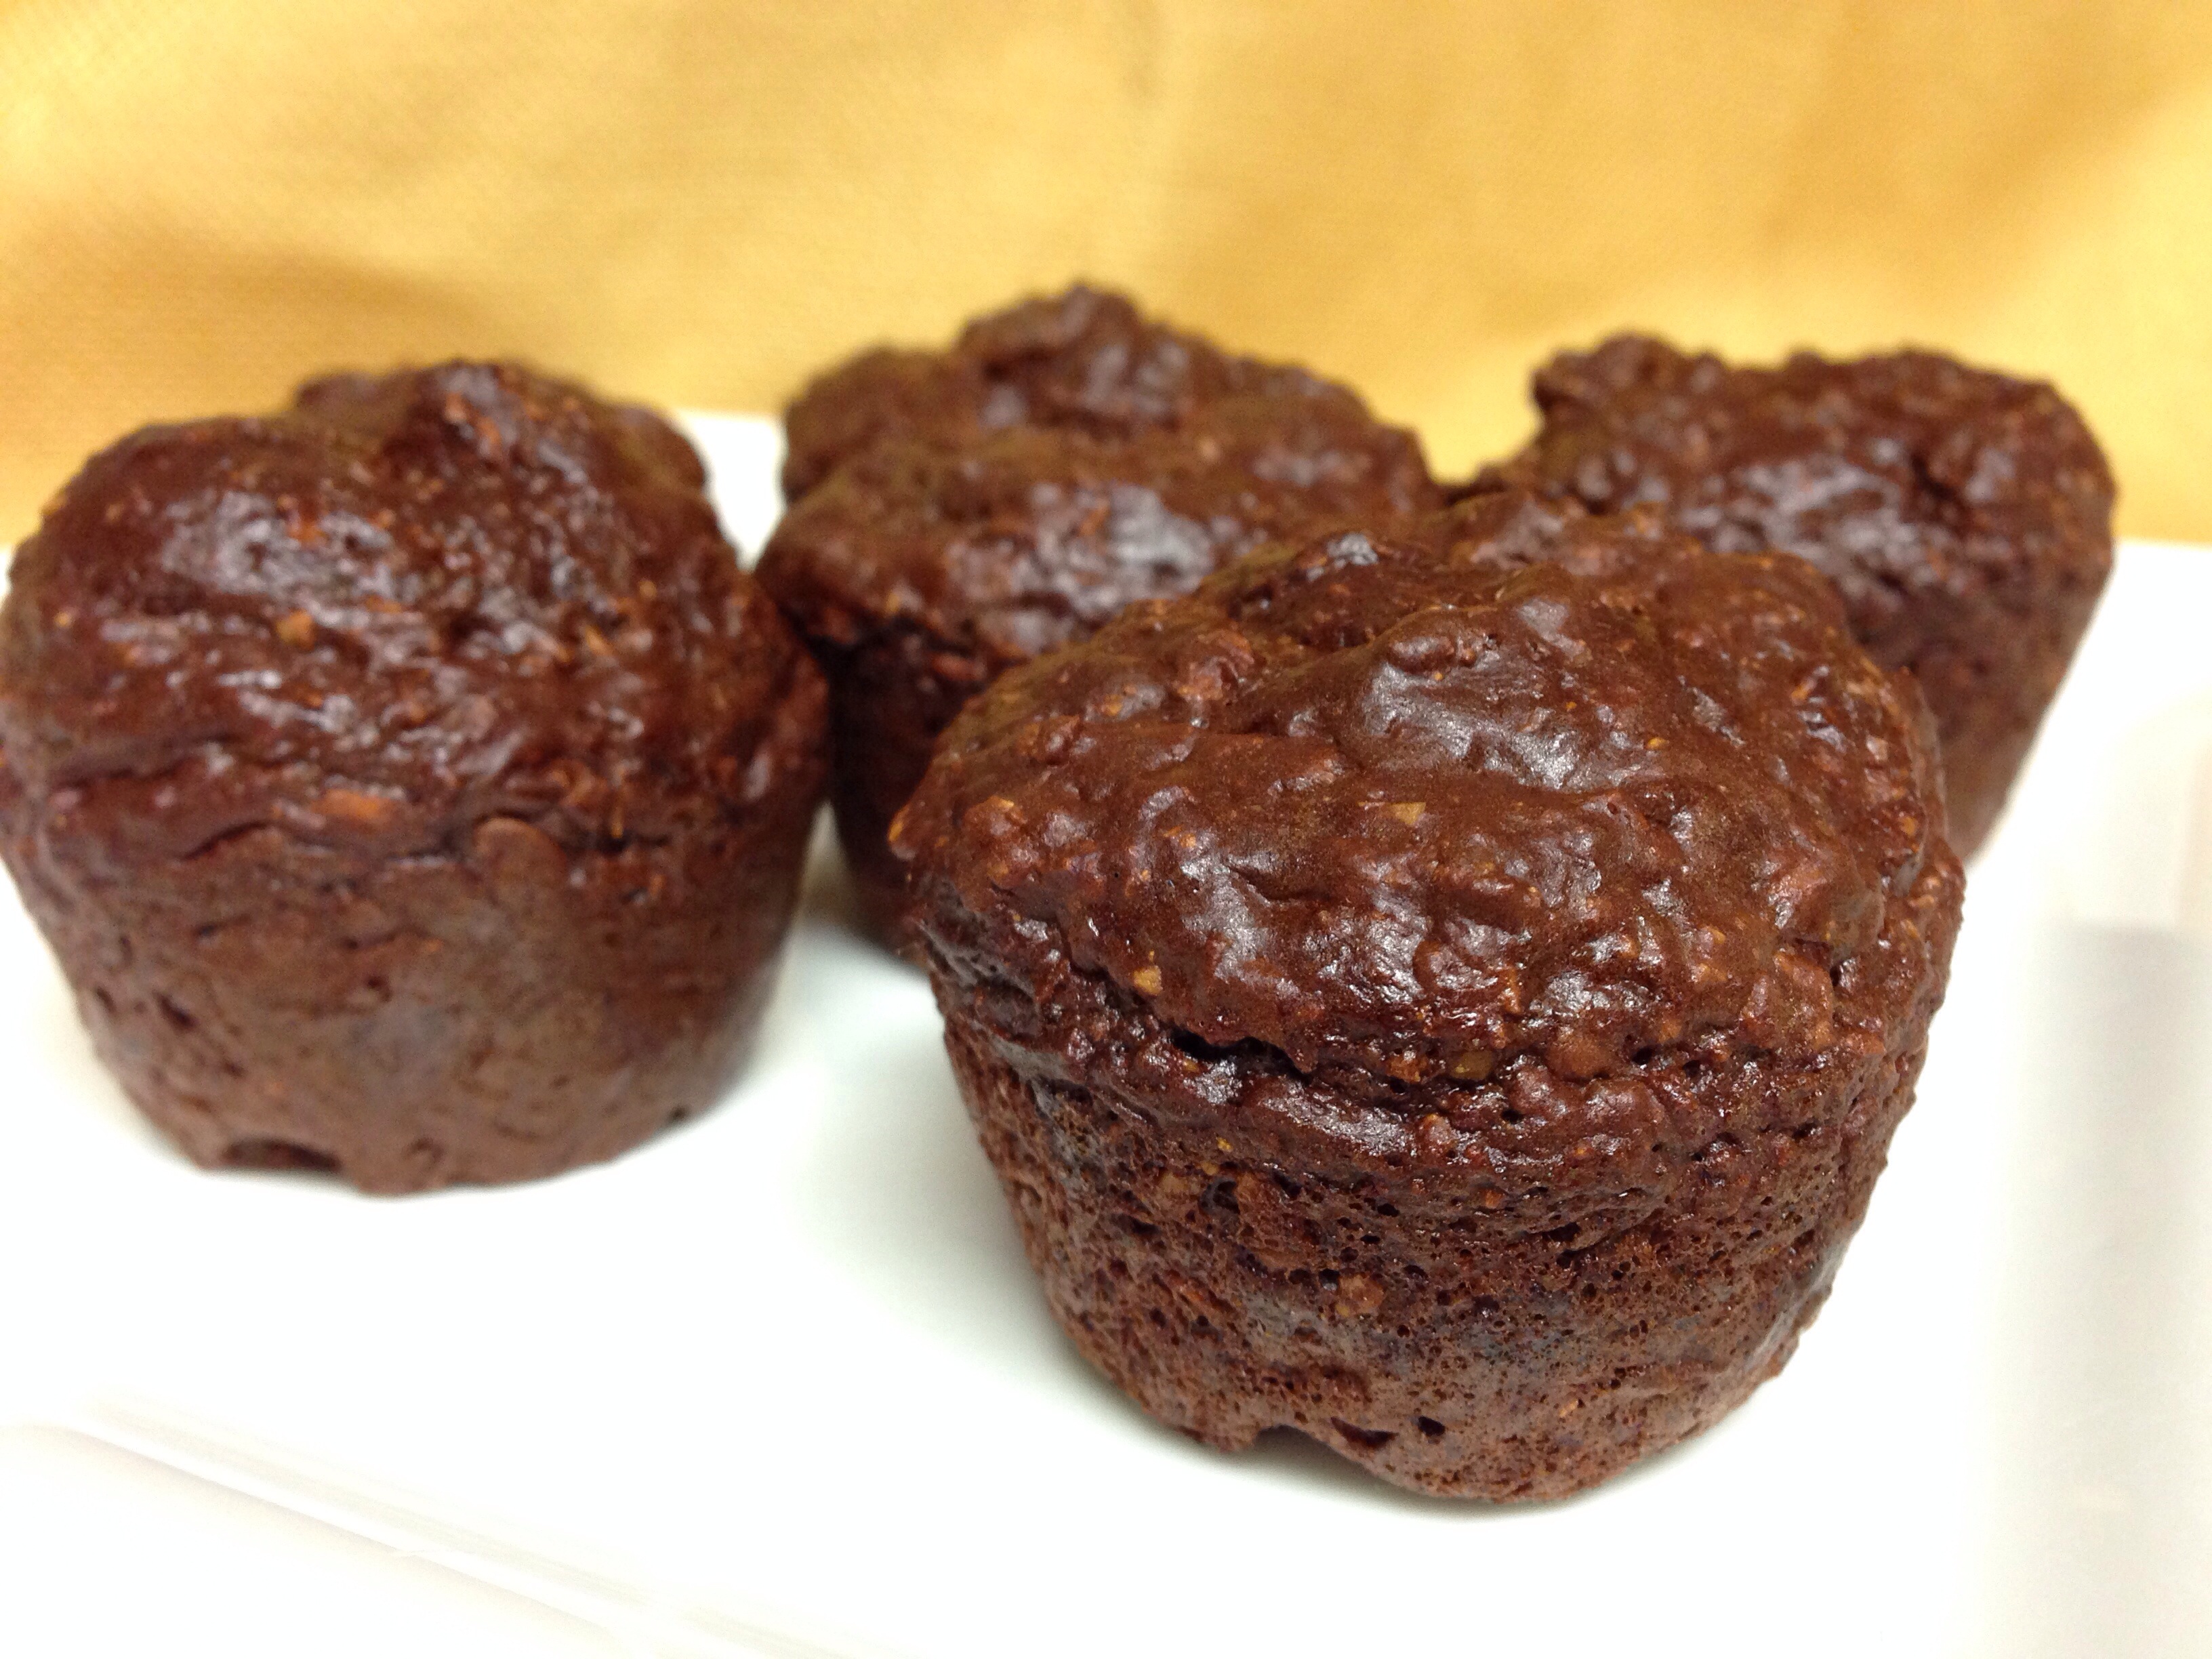
Mini Meatloaf Muffins – an HMR diet recipe to delight!
 I have mentioned before that I love my HMR Core and On-Going classes. We share recipes and stories and I absolutely love the support we give each other. One of my classmates loves to play around with the HMR products and made an awesome meatloaf that she shared on her blog. I have also played with the chili and oatmeal to make burgers which I shared in December as well as submitted to the HMR Web site.
Over the summer I have been to a lot of cookouts and I wanted a way to enjoy BBQs while staying in the box on the Decision Free diet. So I took the meatloaf recipe and played around to create my own portable mini-meatloaf bites!
Mini Meatloaf Muffins
- 2 HMR Turkey Chili Entrees
- 2 HMR Oatmeals (I keep the fruit in the recipe for bites of sweet bbq sauce flavor)
- 1/2 tsp liquid smoke
- 1.5 tsp Worcestershire sauce (I use Annie’s vegan version of the sauce)
- 1 tsp hot sauce
- 4 tbsp water
Preheat oven to 350 degrees. Spray mini muffin pan with cooking spray (you will want a pan that has 24 muffin wells).
Mix chili and oatmeal. Microwave for one minute. Add in remaining ingredients. Divide into the 24 mini-muffin wells. Bake for 25 to 30 minutes (my oven took 27 but my convection toaster oven only took 25). You want the muffins firm but not burnt. They will be moist in the middle so be careful removing them from tin.
I made a dipping sauce of 1 tbsp no-sugar ketchup, 1/2 tbsp low-sodium soy sauce, and 1/2 tsp sriracha sauce. I also used mustard. Play around with your favorite sauces or try my classmate’s special sauce recipe included on her meatloaf blog post!
One half of this recipe is 12 mini-muffins and is one entree and one oatmeal for calculation purposes.
Savory HMR Diet Biscuits

Travel continues to guide my experimentation in the kitchen. I wanted a savory option that could be easily carried on planes, trains, and automobiles!
The 70 shakes have an egg protein in them that helps with the muffins but wouldn’t work well for a savory biscuit. I use the chicken soup but it took awhile to keep the end product from being very dense. The secret is stirring in the baking powder just enough so it’s mixed and activates but not to over stir and lose the bubbles that make it fluffy! I also use a 2-tbsp scoop to portion out the dough on the silpat which means less handling and fewer bubbles lost!
Savory Cheddar Muffins
- 2 HMR Oatmeal
- 2 HMR Chicken Soup
- 2 tbsp Molly Cheese
- 1 cup water
- 1/4 cup water
- 2 tsp baking powder
Preheat oven to 375 degrees.
Mix oatmeal and 1 cup of water. Microwave for two minutes. Stir and let stand for several minutes.
Add in soup, cheese powder and the remaining ¼ cup of water. Stir until combined.
Once dough is mixed, add baking powder. Carefully fold in without losing the air bubbles.
Gently scoop onto a baking pan covered with a silpat mat or parchment paper.
Bake for 15 to 25 minutes until the biscuit is cooked through. Cooking times will vary significantly based on how big you make each biscuit and your personal oven calibration.
This recipe makes six ½ shake servings of three baby biscuits for my prescription.
Don’t forget this is a low-density preparation of the soup and oatmeal. Make sure to drink lots of fluids while enjoying these!
Disney World Decision Free: Vacationing on the HMR Diet
During my 34 weeks on the HMR Decision Free diet, I have traveled more than the average American. And while some of it has been for fun, the majority has been work related and thus relatively regimented. So when I decided to visit my sister for a week in Florida and we decided to spend three of those days in the land of Disney, I got a little anxious about staying in the box.
First, a spoiler, I survived! However I thought it would be helpful to write about my experience for others and also as a reminder to myself for future trips.
According to the WDW Web site:
“Guests with food allergies or intolerances are allowed to bring food into Walt Disney World theme parks and dining locations. When entering a park, simply inform the Security at bag check that someone in the party has a food allergy or intolerance.
Refrigerating and Heating Personal Food Items
Guests staying at a Disney Resort hotel who have items that need to be refrigerated should ask the Front Desk to have a refrigerator placed in the room, subject to availability. An additional charge may apply.Please note that Cast Members are prohibited from storing, preparing, cooking or reheating any food brought into our Resorts or theme parks by Guests.”
I had no issues with Security and didn’t even need to inform them about the food I was bringing in, they must see a lot of things come through.
Before we left, I baked both savory and sweet HMR mini muffins using the oatmeals, soups and 70 shakes. You can find some of my recipes here. I portioned them out into individual servings that were equivalent of a half a shake for me and a full shake for my Healthy Solutions at Home sister.
I also packed a shaker bottle with two 800 shakes, a 70 shake, and a Benefit Bar. As pictured here:
 We also each packed an entree that could be enjoyed cold (Five Bean casserole!), several types of sugar free gum, and a sandwich baggie full of various water flavor squeeze-ins like Crystal Light Liquid (mmmm Sangria and Strawberry Lemonade!) and Dasani Drops (Cherry Pomegranate FTW). The gum and water flavorings allowed us to change up flavors we were experiencing without increasing our caloric intake.
Next, we each packed an empty water bottle to refill throughout the park. We quickly learned you could walk up to vendors who had fountain drink machines and request cups of ice water for free! We would fill up our water bottles with refreshing cold water and play with flavorings. We also purchased various diet sodas and unsweetened iced teas when we wanted a special treat.
The secrets for me were front-loading and keeping myself occupied. I ate an entree before we left in the morning and drank a giant bottle of water. Then I made sure to always have a low calorie beverage in my hand (yay iced water!) so that I could drink whenever I was tempted with food. And I won’t lie… I was tempted! I never craved a turkey leg before (I have never had one) and it was all I could think about for an hour or so after walking past a booth selling them. But we moved away from that part of the park, I enjoyed a couple of flavored waters and bites of a benefit bar, and I stayed in the box.
I think it is easy to give up your diet when you are on vacation. Your schedule is switched up and you are relaxing. You can justify things because you “deserve” them or it’s a special treat. But what I asked myself was if I were never going to return to Disney World, could I live without ever trying X or Y? And the answer I figured out was that I would be fine.
And I am planning my return. My sister and I are all signed up for the Disney Princess Half Marathon in February! So if that turkey leg still sounds good after running 13.1 miles, I may let myself have a bite. But I will be in control of the food rather than allowing it to control me. I will plan for the food. I will also be in a place by then where I have not only transitioned into Phase Two but I will have lived in Phase Two for several months.
I am proud of my success of staying in the box but I also realize my vacation wasn’t ruined by not eating Gap foods. I didn’t need a turkey leg or margarita or mouse-shaped pretzel to complete my experience. This realization has helped me further separate food from my day to day life. Food is fuel and it can be a delicious experience but it is not the whole experience.
Now to remember this all as I head into two weeks of travel into major “foodie” cities like New Orleans!
Traveling on the HMR Diet
I have been on the HMR Decision Free Diet for almost 16 full weeks. During those 16 weeks, I have flown away for weekend work (and one personal trip) for 8 weekends and spent another 4 weekends at regional competitions. With 12 weekends away from the comfort and safety of my home environment, I have quickly learned some skills for traveling on the HMR DF Diet and I am looking forward to sharing some of them now!
First, let’s dispel some rumors. I have carried entrees and shakes through airport security every trip and have never been stopped. However, I would always recommend carrying some documentation of your medically supervised diet just in case you get a TSA agent with his britches in a bunch claiming HMR chili is a liquid.
Second, the majority of hotels I have encountered have been amenable to placing a mini-fridge and in most cases a microwave in my hotel room free of charge provided I show the medical necessity (same documentation). Many never needed to see it, I just needed to ask and explain.
Third, if you haven’t already figured it out, many of the entrees can be eaten cold. I will be honest… I am NOT a fan of most of them at room temperature. My stand-by is Five Bean Casserole (add a packet of salt and a packet of pepper and maybe a squeeze of mustard from an airport food court and you’re golden). I will also do the chicken parm and the ravioli and the lasagna. It’s up to personal preference.

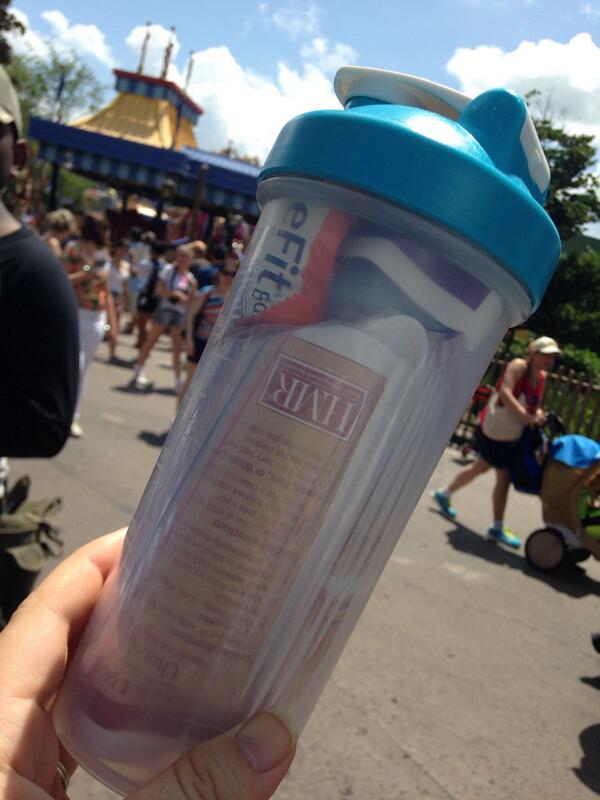
Two great on-the-go shaker bottles… liquid included!
When I am checking a bag for a longer trip, I like to travel light with the carry-on. This means packing as compactly as possible. First, I fold up two of the 800 packets and one 70 packet into my standard Blender Bottle along with a plastic spoon. This prevents the wire ball from bouncing around, saves space, and gives me an easy pudding and two shakes!
I also pack at least one Mio or Crystal Light squeeze bottle for easy to-go flavoring in my liquids bag. Great for making shakes different flavors and perfect to add to a club soda on a plane for a “fancy” drink!
However, I hate cleaning when traveling and thus when I get through airport security, I am often on the hunt for one of the stand-by beverages pictured above. It makes a perfect disposable shake container. Just swirl your shake powder before shaking or the powder may all end up in the lid!

This was my HMR meal at the San Diego Zoo. Just drink half the bottle, add shake mix, swirl and shake to your desired consistency! Mmmmm Chocolate Lemon Goodness!
I am also a big fan of mixing up the flavors of my entrees and having other savory options available to me is a big way I have managed to stay “In the Box” while “On the Road.” I always have a couple of bouillon cubes in a snack bag (to keep the smell contained) as well as a couple of tea bags for on-the-go hot beverage choices. I also carry a travel milk frother (mine has a cute carrying case!) which I use to whisk hot liquids for soup and hot chocolate shakes.
Additionally, I carry a menagerie of seasonings in a travel pill case (pictured below) which I place in a sandwich bag (because I am paranoid about spills but haven’t had one yet!). You can put all of your favorites in here! These are just some of my standards.

Turn your pill case into a travel condiment container!
Another way to make travel easier and make you feel included when others are eating carby goodness, is to make some HMR muffins (I make these without the frosting) ahead of time. I don’t do this often because I want to avoid over-relying on low-volume foods. However I have found packing these can save me in a pinch when everyone else is noshing on trigger foods plus these don’t require preparation. This is one I save for super high stress weekends (I also make these using a mini-donut pan that fits in my toaster oven which makes them smaller – I get more and they are easier to pack!).
Make muffins ahead of time for packable meals.
Traveling can be difficult on the HMR diet, or any diet, because of the temptations that lie in the Gap and all of the fabulous looking foods that abound. It is much harder to control your environment and at some point in the future I will talk more about how I prepare mentally for travel. However in the meantime, I hope these travel tips are helpful for those who have travel in their future!
