
Overnight Oats – HMR Decision Free Portable Breakfast!
It’s been a short stint since I’ve posted (despite having dozens of things I want to share!) – but since I’m up past my bedtime watching election results, I thought I’d share something quick and easy I’ve been enjoying during this stressful time of year (end of the school year is crazy for teachers!).
You can switch up the flavor of pudding, but I like the cheesecake flavor combined with the thick texture of the overnight oats – awesome for breakfast but would also make a great last meal of the night!
HMR Diet Overnight Oats
- 1 HMR Multigrain Cereal
- 1 tablespoon fat-free, sugar-free cheesecake flavored pudding mix powder
- 1 cup water
I mix everything up using a fork (to prevent clumps of powder) in a portable container with a lid. Put in the fridge overnight. The oats and pudding mix absorb the liquid and create a thick, almost solid, oatmeal. Perfect for the post-morning workout meal and easy to transport (I’ve been eating it on my walking commute this week).
You can play with the amount of liquid to get the texture you want. I like it thick and rich, so one cup of water is perfect. And yes, I eat this cold – I have never tried to heat it after soaking it all night.
Disneyland and HMR Healthy Solutions
In 2014 I traveled to Disney world and wrote about staying in my Decision Free Box. Well this weekend I was chaperoning our Senior Trip in Southern California and I wanted to share my day at Disneyland because I wanted to record how I stayed in the HMR Program box while in the “Happiest Place on Earth (with the most delicious smells!)”
I started my morning at the hotel with two big cups of fresh cup fruit and a mug of plain black coffee. The goal today was to eat supportive foods whenever I felt hungry, so I also grabbed a banana and an apple and two cups of grapes to throw in my bag. I was carrying all of my supplies in a super light collapsible pack that prevented me from feeling weighed down or burdened by bringing my own food. In addition to my hotel fruit, I had also brought:
- My all black SportMixer Blender Bottle (that disguises well as an ordinary water bottle since I was feeling a bit self-conscious)
- Two servings of HMR Cookies (aka one recipe linked here)
- Two packets of Walden Farms salad dressing (not my favorite – but shelf-stable and works in a pinch)
- A Chocolate Benefit Bar
- An HMR Chili
- An HMR 5 Bean Salad
- 3 servings of HMR shakes to be mixed in the bottle
- An HMR 70 shake packet in case I wanted a pudding
It was a lengthy drive to Disneyland from the city we were staying in, so I enjoyed a chocolate shake and a packet of cookies during the commute.
Once through all the shuttles and security, we started out at California Adventure. I skipped the Soaring ride (I get a little extra queasy on it) and enjoyed my chili and the banana. This helped keep me full since I had been up for quite a few hours at this point in the morning and I could eat the entree without feeling watchful eyes of coworkers, most of whom did not know about HMR.
A little bit later in the morning while my friends enjoyed soft serves and root beer floats, I ordered a Diet Coke and poured it into my shaker bottle. I added a vanilla shake and had my own Diet Coke Float! (Note I shake in the Blender Bottle carefully but then slowly unscrew the lid to release the carbonation rather than pop open the top which causes liquids to fly!).
After traversing California Adventure including riding Guardians of the Galaxy (oofta that one shook me up!), we went over to the Magic Kingdom to grab a Fast Pass for Space Mountain and to have lunch. My friends grabbed pizza in Tomorrowland while I grabbed a plain side salad. I topped it with my Walden Farms dressing and donated the high-calorie dressing to my friends to dip their breadsticks in. Once I finished my salad, I ate my two cups of grapes. I don’t eat a lot of grapes because of the sugar content (they are really sweet to me) but there is something to be said for keeping your hands busy with those little buggers. I also enjoyed sipping on a diet lemonade.
Then we were off to the Matterhorn and then on to Adventureland. At this point in the day it was getting quite warm. I grabbed some fresh mango after we rode the Jungle Cruise to enjoy while in line for Haunted Mansion. It was delicious topped with some Tajin. The line was about an hour, so I finished off my second serving of cookies as well.
After the Haunted Mansion, my friends wanted to get Dole Whip. I wasn’t super hungry but I did feel tempted as it was close to when I would normally eat dinner (but we still had many hours left in the park)… so I ordered a fresh pineapple spear. At this point I was quite full.
Some shows, some more rides, and then we had just an hour left before we left to go back to our hotel. There was a pizza party when we got back to the hotel and some of my coworkers wanted to get a real meal instead of the pizza. So we left the park in search of food. I enjoyed a massive spicy fruit salad at a restaurant in Downtown Disney as well as my 5 Bean entree.
On the bus ride home, shortly before heading into the pizza party, I ended my day of dining with my chocolate Benefit Bar. This special treat left a sweet chocolate taste in my mouth and was the perfect topper to keep me full while in a room full of one of my favorite foods.
I didn’t end up going to bed until about midnight, so it was an incredibly long day. However I stayed in the box (and walked almost 22,000 steps!) which helped keep me motivated to stay in the box during the remainder of the trip.
Have you been to a theme park while in Phase One? Would love to hear how you stayed in the box during your visit!
Healthy Solutions Spaghetti and Fried Ravioli
This recipe can be made with or without the ravioli entree, but after a heavy activity day it’s super filling and the ravioli feels like a special treat! You can also just make the spaghetti and top it with an entree to save time. I will sometimes batch cook the spaghetti and portion it out to use over the course of a week – sometimes making it with the ravioli, sometimes eating alone, and sometimes topping with another HMR entree like the penne or lasagna.
NOTE: There is no salt/sodium in the spaghetti without the HMR entree sauce added, so if you are having it by itself, you may want to add some salt to amp up the flavor.
Fried Ravioli
- HMR Ravioli Entree
You will need an air-fryer for this part of the recipe. You could also bake the ravioli or pan fry it if you want. It’s relatively simple! Just scrape the sauce off the ravioli (save it for the spaghetti) and place the ravioli in a single layer in the air-fryer. Cook for 10 minutes at 390 degrees, flipping over once during the cooking process.
Healthy Solutions Spaghetti
- Two cups cooked spaghetti squash (approximately half a small-medium squash)
- 1 small-medium white onion, diced
- 1 large tomato, diced
- 1 tsp Penzey’s Pasta Sprinkles
- 1/2 tsp Penzey’s Roasted Garlic
- Sauce from HMR Ravioli entree
Heat a large frying pan to medium-high heat. You may want to use a quick spritz of cooking spray depending on the pan you have chosen (you can also just occasionally sprinkle water as you cook to keep things from sticking).
Cook the onions for several minutes in the hot pan, stirring frequently, until the onions start to soften and start to become translucent. Add the spaghetti squash and Penzey’s spices. Stir to combine and cook for another two minutes. Add the chopped tomatoes and stir to combine, cook for one more minute. Finally, add the sauce from the raviolis and stir, cooking for approximately one more minute.
Enjoy the spaghetti with the raviolis on top or on the side. You end up with 4 cups of vegetables and an entree as your incredibly filling meal.
Savory HMR Porridge
When you have been enjoying HMR meals for over four years (yes I used them in Phase Two and Phase One) and nine of those months were an exclusive relationship (Decision Free), sometimes you try out some combinations that don’t necessarily sound appealing to the causal observer.
I have said before that I never post a recipe in this blog that I haven’t tried several times to ensure it’s reasonably accurate and worth sharing. Well today’s post is a recipe I have been making for years but is just strange enough I haven’t shared because I know it’s going to sound odd to almost everyone. But I finally had to confess to my secret love for savory porridge.
Traveling and exploring different cultures through food meant this concept was not new to me. I have had savory porridges in a number of countries. However this unique combination of HMR food puts a special spin on this dish.
Savory HMR Pudding
- HMR Oatmeal (I pick out the biggest chunks of fruit)
- HMR Soup
- 2 tbsp Franks Buffalo Wing Sauce
- 2/3 cup of water
- HMR BBQ Chicken Entree (I chop up the chicken into little pieces)
Mix oatmeal and soup together in a large microwave safe bowl. Add in wing sauce and water and stir until it all mixes together. Microwave for 3 minutes.
When you remove from microwave, the porridge will have thickened but upon stirring you will still find it is oatmeal-like in consistency. Add in the BBQ chicken entree (yes the whole shebang) and stir. Microwave for another 90 seconds.
Remove from microwave and enjoy. Warning it will be hot!
You can microwave for longer to thicken the porridge into almost a savory bread. You can also add more water initially if you want a soupier consistency. I have found the measurements above to be perfect for the consistency I enjoy which is a thick savory porridge with a little heat from the wing sauce, sweet from the bbq sauce and tiny bits of fruit, salty and almost a little cheesy from the soup.
This dish sticks inside of me and keeps me full for hours. I will often eat it the night before a big run or eat it right before heading off to a social event as I know it will fuel me and keep me away from temptations for hours.
Let me know if you try this and what you think! Or if you have your own HMR savory porridge recipe!
When you just can’t ignore the sweet tooth
It’s been a rough couple of weeks in our house and through it all, I’ve fought to stay in my Healthy Solutions Box (aside from when I had Strep last week and could barely get down water, forget a veggie or entree!). I know it’s been rough because my fruit consumption has drastically increased over my veggies, as I’ve been choosing berries over broccoli in my emotion-clouded mood. Don’t get me wrong, I know fruit is awesome and it’s not a terrible choice. But I also recognize I just wanted something sweet because I associate sweet with happier times.
With one shake left to get in my minimum prescription tonight, I opted to have a special treat saved only for that rare moment when I need an extra kick to keep me in the box. And yes I call Benefit Bars “candy bars” – because it helps to remind me they are a “sometimes food” – a tool but more energy dense and addicting than other HMR foods.
Chocolate Peanut Butter Candy Bar Pudding
- HMR 70 chocolate shake packet
- 1/2 tbsp unsweetened cocoa powder
- 1/2 tbsp PB2
- 1 tbsp Torani sugar-free salted caramel syrup
- 2-3 oz cold water
- HMR peanut butter Benefit bar
Mix the shake, cocoa and PB2 together in a bowl. Add syrup and slowly add cold water. The amount of water is a personal decision depending on how thick you want the pudding. Normal HMR pudding is 2oz but with the additional dry ingredients it can be more like a dough.
Place in freezer to expedite the thickening. While it chills, chopped up Benefit bar. Mix into pudding. I actually throw the bowl back into the freezer so I end up with a pretty solid pudding with frozen chunks of candy bar.
This is a more caloric way of enjoying your HMR foods – so I don’t have it often. However it is an easy and relatively quick way to prepare a sweet treat when you need something special.
HMR Healthy Solutions Peanut Butter Chocolate Banana Bars

A couple of weeks ago I went camping and trail running – all while staying in the HMR Program Healthy Solutions Box. However I had to plan ahead and prepare foods that would be supportive of both the HMR program, but also of the endurance activities I would be participating in. With no way to heat up my normal oatmeal in the morning, I got creative!
These bars are a higher calorie food that are relatively compact in nature. While I wouldn’t make them every day, it was a method of combining foods I use to fuel before long runs in a portable manner. My normal oatmeal with a tbsp of PB2 and a side of banana would have been much higher in volume, and I honestly wouldn’t have had the shake because I would have already been full. However this worked for me for fueling for the trail half and also gave me some additional snacks to enjoy during the weekend when other people were recovering with bagels and beer.
HMR Healthy Solutions Peanut Butter Chocolate Banana Bars
- 1 HMR Oatmeal
- 1 HMR 70 Chocolate Shake
- 1 tbsp PB2
- 1 tbsp Fat-Free Sugar-Free Banana Pudding Mix
- 1 small ripe banana
- 4 ounces water
Preheat oven to 375 degrees.
Mash the banana in a mixing bowl and add the dry ingredients to it. Slowly add the water in until you get a cookie dough consistency (you may not need all of the water depending on the size and ripeness of the banana – both of which will impact overall moisture of the batter).
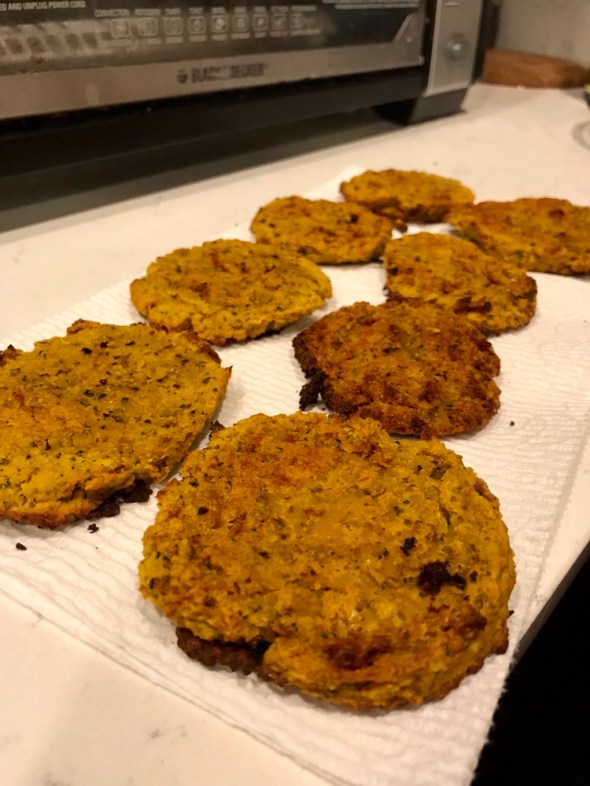
Scoop out dough on a cookie sheet lined with a silicone mat. I shaped the dough like bars, but you could easily just put scoops out and end up with cookies.
Bake for 15-20 minutes (will depend on your oven calibration and moisture content of your dough) until your bars are baked through. They may still be slightly soft on the underside, but I found flipping them on to a paper towel will allow them to cool while the steam escapes. Leaving them on the hot pan could cause textural issues as the steam tries to escape and is trapped.
One recipe made 4 bars. I doubled the batch for the weekend I went camping and it was plenty for fueling and recovery (it was super delicious to pair a bar with a shaken HMR chocolate shake over ice post-run).
Celebrating 4/20 the HMR Healthy Solutions Way!
Did you know April 20th was a day recognized around the country as a very special day? It’s true! On 4/20, people around the country gather together to recognize National Pineapple Upside Down Cake Day!
What better way to celebrate than with an HMR muffin! These won’t quite replicate the cake itself (but to be honest I have forgotten what that cake tastes like), however reading through a number of recipes and descriptors, I have crafted what I think is pretty darn tasty.
I have to thank one of my HMR Program classmates who mentioned making muffins with canned pineapple for the inspiration behind this recipe. (She also recommended what our class calls “The Rosé” – a double entree mixing the Penne and Alfredo – SO GOOD) I LOVE being inspired by my classmates – their stories and experiences motivate me going into rough weeks as I reflect on the lessons I have learned from them.
HMR Pineapple Muffins
- HMR Oatmeal packet
- HMR 70 Vanilla packet
- 8 ounce can of crushed pineapple in it’s own juice
- 1 tsp rum extract
- 1/2 tbsp baking powder
- 2 pumps Torani Sugar-Free Coconut Syrup
Preheat oven to 375 degrees. Prepare your baking tins. I use a silicone mini muffin tin which expedites cooking time while making it easy for quick release – I also use a quick spritz of cooking spray in the tin before filling it with batter – this also helps with release of the baked muffins.
Mix all of the ingredients together. Fill batter tins. It’s really that easy. The liquids from the pineapple, extract, and syrup are enough to moisten the batter. If you don’t like rum and coconut extract you could easily sub those out. I’m thinking the brown sugar syrup and vanilla extract might be nice as well. Or a brandy extract and a cherry syrup. I was going for a bit of tropical flair after being inspired by my classmate, but the possibilities are endless!
Bake for approximately 15 minutes until the tops of the muffins have browned. Then pop them out of the muffin tins to cool. Your baking time may vary based on oven calibration and muffin tins used.
Beet & Bean Burgers – Camping on HMR Healthy Solutions

This weekend I am stepping out of my comfort zone and going to a weekend trail-running festival. I’ll be attending alone, and will be surrounded by a community of runners. I am a ball of nervous excitement with dashes of social anxiety.
It will also mean a lot of calories being torched as we run 14ish miles with 2700+ feet of elevation gained, in addition we will do yoga and hiking. But the festival provides food all weekend, most of which is outside of my HMR Healthy Solutions Box.
My box is my safety net. And to reduce my anxiety, to settle my nerves, I did a lot of meal preparation and recipe testing. This is what I plan to enjoy when the menu is burgers on Saturday night!
I read several dozen recipes to create this Healthy Solutions Beet & Bean burger that is delicious but is also transportable and can be tossed on a grill or eaten cold.
I made it earlier this week and grilled up some of the patties after refrigerating them overnight. Then I topped them with fresh basil and chopped tomato to create bruschetta burgers!

I make smaller slider patties because they cook quicker and can be easily eaten with a lettuce “bun” – I haven’t tried full size patties but will warn you may want to lower the temperature in the oven and cook significantly longer to allow the burger to cook through (otherwise it will be soggy in the middle).
You will find photo step-by-step below. Also note you could sub out a different beet. Might change up the color and flavor a bit but I know beets can vary region to region.
Beet & Bean Burgers
- 2 medium-large golden beets pre-roasted (I just wrapped them in foil and baked them earlier in the week when roasting vegetables) and cooled
- 1 cup garbanzo beans
- 3 tablespoons aquafaba (the liquid from the canned garbanzo beans)
- 1 tablespoon Pasta Sprinkles (you can use a general Italian seasoning – I happen to love this blend of herbs and garlic – just avoid blends with added salt – the soup is salty enough)
- 1 HMR Chicken Soup
Preheat oven to 375.
Using a food processor, grind up beets and beans into a coarse riced texture. Scrape down sides. Add pasta sprinkles seasoning and aquafaba.
Process for several more minutes until you have a paste-like substance. Then scoop out into patties on a cookie sheet covered with a silicone mat or parchment paper, sprayed with a small light cooking spray mist (I use a biscuit circle to create the shape – but it’s not necessary).
Bake for 25 minutes. Flip over (be careful they are still soft!). Bake for an additional 25 minutes. Remove and let cool on a rack or paper towel.

Easy Healthy Solutions Meal Prep: Chicken Creole

As Spring Break winds to a close, I’m back to prepping multiple grab-and-go meals for the week. I wanted to share this one because someone who reads my blog told me they don’t like cauliflower (what?!?) and was looking for fast ways to add vegetables into their diet.
This one is quick and cheap. So easy I can’t believe I haven’t shared it before!

This bag of fire roasted veggies from Trader Joe’s has no added oil and approximately five cups of veggies! So I throw the whole bag in a large hot frying pan and stir while it defrosts and starts to warm up.
I add in two HMR Program Chicken Creole entrees into the pan and sprinkle in my favorite Creole seasoning. Continue to stir for several minutes until all the flavors have come together.
I divide the mix into two half for two quick meals that are easy to reheat and contain 2.5 cups of veggies already cooked in!
Creamy Penne and Meatball Soup – An HMR Decision Free recipe
A few weeks ago we had a homework assignment to combine the HMR Program chicken soup with an entree. This increases our fullness level which makes those calories last longer. Plus it’s delicious!
I’ve been doing this a fair amount after finding success with it during that homework assignment. This is one of the recipes I’ve been enjoying that helps up the fullness factor.
Creamy Penne and Meatball Soup
- HMR Chicken Soup
- HMR Penne and Meatball Entree
- Chicken bouillon cube
- Italian Herb Seasoning Blend (I use Penzey’s but feel free to sub in your own!)
- 1 cup of water
Microwave water and bouillon cube in a large bowl for 90 seconds. Whisk in soup packet and a couple dashes of Italian seasoning blend.
While you are whisking the broth, soup, and seasoning; microwave the Penne entree for one minute.
Whisk the entree into the soup and enjoy!
Double the Trouble, Double the Fun, Double the #HMRDiet Entree!
A few weeks ago I mentioned having a homework assignment to increase my entrees during a challenging day by one higher than my highest. That meant having SIX HMR Program entrees in addition to the rest of my Healthy Solutions prescription of 3 shakes and 5 servings of fruits/vegetables.
That number seemed outlandish. Grotesquely outlandish. But I was determined to complete the assignment and to learn from it.
So I started my morning with a double-entree. I figured if I had two in the morning, I would already be well on my way to completing the mission. And then I could continue my regular schedule, inserting a few more entrees in throughout the day.
I ate a combination of turkey chili and chicken creole that morning. It was an odd but not off-putting combination. I had a microwave handy and knew I wouldn’t eat the creole entree cold, so I wanted to take advantage of this opportunity. I threw on some cajun seasonings and a couple dashes of hot sauce, and ate it while sipping a cold brew coffee.
A couple of hours passed, and I was scheduled to have a snack. Veggies with a lentil entree as a dip. Only I wasn’t hungry. I was still full. I realized I wasn’t even close to hungry until significantly later than I normally would be. And I normally eat more food in the first half of the day than in the second. It was amazing!
Upon reflection, I realized I had never tried a double entree in the morning. I often have entrees in the earlier half of the day, I don’t have an issue with a lasagna for breakfast. But because I wanted to space entrees out in the day, to ensure I had one in the afternoon or evening, I would refrain from front loading my day with entrees. However, since I had been challenged to fit so many into my day, I didn’t hold back. And I was pleasantly surprised with the results!
The extra fullness was powerful. I was able to power through my day in such a manner that when the next day began, I started it with a double entree too! I walked thousands of steps that weekend and never had anxiety about food or felt a tinge of hunger. When faced with environments full of out-of-the-box temptation, I didn’t feel tempted because I wasn’t hungry.
While I probably won’t eat six entrees in a day again, or if I do it will be rare, pushing myself out of my comfort zone allowed me to find a new comfort zone. I realize a double entree is still fewer calories than a couple of slices of pizza, and a heck of a lot more filling. That the crowding out effect is real and that I shouldn’t be afraid of an extra entree to kick start my day.
With this in mind, I wanted to share my current favorite double-entree combo. And I would love for you to share yours as well. I know there are a lot of them out there I haven’t tried and I’d love to hear about them!
HMR Decision Free Buffalo BBQ Chicken Bowl
- HMR Chicken Pasta Parm entree
- HMR BBQ Chicken entree
- Franks Buffalo Sauce
You will need a bowl big enough for two entrees (I learned this the hard way!). You may include optional seasonings like Molly McCheese or an in-the-box ranch dip seasoning mix (just a 1/4 tsp of the powder on top of the bowl after cooking) however I like this one pretty simple.
Begin by scooping the chicken pasta parmesan entree into the bowl. Add the rice & beans as well as all of the BBQ sauce from the BBQ entree. You will want to scrape the sauce off the piece of chicken.
Dice the chicken breast up and mix it into the bowl with the other ingredients. Cover bowl and microwave for two minutes. Top bowl off with a healthy dose of Franks Buffalo Sauce and enjoy! INSANELY filling!
Peanut Butter and Jelly Oatmeal – An #HMRDiet #HealthySolutions Recipe
This is one of my favorites – so easy and quick but flavorful and filling! It doesn’t actually have jelly in it but the berries soften up during the cooking process making them gooey in the peanut butter oatmeal.
Peanut Butter and Jelly Oatmeal
- HMR Oatmeal
- 1 cup frozen mixed berries
- 3/4 cup water
- 1 tbsp PB2
- 2 pumps Torani sugar-free Belgian Cookie syrup
Mix all ingredients in a bowl and microwave for two minutes. Stir and enjoy!
Celebrating Pi Day with an #HMRProgram In-The-Box Decision Free Pizza Pie!

Yesterday was my birthday. I was born on Friday, March 13. And to me, it’s always been the BEST day of this particular week. While others might get excited about the Ides of March or Saint Patrick’s Day, I had my own special day to celebrate.
It wasn’t until later in life that I found out Pi Day was even a thing people celebrated. 3.14 – sure I guess that makes sense. And I have some friends and students who REALLY celebrate Pi Day. They go ALL OUT. So as an adult, I have become accustomed to celebrating it as well. Pizza pie, shepherd’s pie, and all the dessert pies you can imagine (which is only funny because I really like cake a lot more than pie, but hey it’s the holiday for pie so it’s a good thing I could have cake the day before!).
Well if you are like many of my friends and students and plan to celebrate PI DAY but are looking for an HMR Program-Friendly option, there’s always the Healthy Solutions Shepherd’s Pie or my Decision Free Pizza Pie! I make this pizza with a BBQ chicken entree, but you could top it with your favorite entrees (or veggies if you are in Healthy Solutions!).

This recipe’s crust is based on my Savory HMR Biscuits – I halved the recipe for the crust and picked out all the big chunks of fruit. Yes it might have a little residual sweetness, but that’s why I top it with the BBQ Chicken Entree – the sauce masks the teeny bits of fruit I might have missed. And no need for cheese! There’s some in the crust which helps extend the flavor!
HMR Diet Decision Free Pizza
- 1 HMR Oatmeal
- 1 HMR Chicken Soup
- 1 TBSP Molly McCheese
- 1 tsp Baking Powder
- 1/2 cup of water and 2 tbsp of water (added at separate times)
Preheat oven to 375 degrees.
Pick out big chunks of fruit from oatmeal.
Mix oatmeal and 1/2 cup of water. Microwave for one minute. Stir and let stand for several minutes.
Add in soup, cheese powder and the remaining 2 tbsp of water. Stir until combined.
Once dough is mixed, add baking powder. Carefully fold in without losing the air bubbles.
Gently pour onto baking pan covered with a silpat mat or parchment paper – gently spread out without letting any breaks occur.
Bake for 15 to 25 minutes until the center is cooked through. Cooking times will vary significantly based on how thick you make it and your personal oven calibration.
After removing from oven, carefully flip onto a plate. This will prevent the underside from getting soggy from the damp heat but will also allow the harder side of the crust to be on the bottom when eating the pizza for a better hold.
My pizza was a BBQ Chicken pizza. I heated up the entree per normal instructions. Then removed the chicken and diced it up. I spread the sauce on the pizza and topped it with the diced chicken. I also added a drizzle of hot sauce and a sprinkle of smoked salt as well as some dried crushed peppers and dried basil. Then I used a pizza cutter and cut the pizza into four slices.

Traveling on the #HMRDiet – Healthy Solutions Style!
When I was on the medically-supervised HMR Diet Program (Decision-Free), I traveled 20+ weekends a year for work. And I blogged about it. I even traveled to Disney World and stayed in the box!
However as I am working to make vegetables and fruit the major portion of my diet, I realized I would need a new approach to traveling on the HMR Diet Healthy Solutions program. So I spent several weeks thinking about this, not only because I knew I would be traveling in March, but also because I needed to find a way to manage my weight during the long summers I teach at residential programs away from home, where I don’t have a kitchen and live in a dorm.
This weekend was the first test of traveling in the box and I wanted to document what I did so I can reflect on it in the future (and maybe help others out too).
I should also add that this week’s homework assignment for our Phase One class was to eat one more entree that our previous highest entree total for a day. In the first week in Phase One in January, I had two days where I ate 5 entrees (and still lost!), so I had to pick my most challenging day and eat six entrees. I’ll write more about that later but I do have to give a special shoutout because it meant I had to pack even more entrees for a three day trip than I had planned, but it actually served to be a very useful tool I might have otherwise not considered because I *didn’t* want to pack tons of extra entrees!

So what did I pack for my 3 day trip?
Food:
- A minimum of 3 entrees for each day of travel (well in this case I packed 13 instead of 9 because I had that special assignment) – most of these needed to be entrees I could eat cold in case plans changed (although I did have a microwave at the hotel and my HotLogic Mini packed). I may switch this to having 4 a day on hand after my experiences this weekend – front-loading with a double-entree for example really made the day a lot easier!
- 6 packets each of chocolate and vanilla 800s (they travel easier than the 120s)
- 2 packets of 70s for emergency pudding
- 2 batches of pudding cookies (divided into 4 snack size bags equivalent to 1 shake each)
- 3 benefit bars for emergency treats
- 4 pieces of fruit pre-washed that stand up to the jostling in my backpack
- 1 carton of blueberries with 1-cup snack bags packed to divided up upon arriving at the hotel (the fact the snack bags have measurements on the side make it easy for portion control!)
- 15 1-cup baggies of vegetables pre-washed and sliced that could be eaten alone or used as chips to eat the lentil and bean entrees
- Jicama
- Cucumber
- Carrots
- Celery
- Snap Peas
- 1 diet soda can (stored in my BlenderBottle) for an emergency mix-in
Equipment (don’t worry, I don’t use affiliate links! just sharing where I bought them):
- eBags Crew Cooler – after a lot of research, I settled on this bag with a removable liner. The top portion is where I store tools, the front pouch is condiments and my food journal, the side pockets for bottles (they zip up when not in use), and the main compartment for food. It looks professional, has a loop in back to slip over a roller suitcase, and has an easy to carry shoulder strap.
- HotLogic Mini – this fits easily in the top pouch of the cooler and is perfect for heating up food while I am in meetings (and in case the hotel didn’t have a microwave).
- BlenderBottle – Easy to use and clean, I picked one that matched my cooler.
- Bottle Brush for cleaning the shaker bottle.
- Travel cutlery for easy dining.
- AeroLatte Travel Frother – perfect for mixing hot shakes (and soups when I take them)
- Extra quart-sized ziplock bags. I actually also had travel ice blocks for this trip because we weren’t flying. But I keep extra ziplock bags to make ice packs on the road – getting ice from the hotel or a restaurant – to keep things cold.
I have also successfully purchased fruits and veggies at local spots, like having a bowl of fruit when taking my students for ice cream. But I didn’t want to rely on those options being available.
And yes, I will most likely have food left at the end of the trip. My students and coworkers also enjoyed munching on some of my vegetables when they were hungry so packing more was a great idea!
I won’t get home from my trip until this evening, but so far so good. I have survived a pizza party, an ice cream social, and a number of other temptations. And I haven’t suffered any anxiety about making a decision or not having options when I am hungry. I’ve met my minimums (and then some) and I have rather easily stayed in the box!
Creamy Butternut Squash Soup – an #HMRDiet Healthy Solutions staple
Whenever I post a recipe on my blog, you can safely assume I’ve made it a few times to ensure I not only think it’s good enough to save for reference but that I have worked to perfect all of the measurements and prep methods. With this in mind, this recipe is one I have been enjoying multiple times a week for several weeks, but because I’ve been playing with all of the different spice combinations, I couldn’t pick just one to share!
So while I have finally settled on my favorite version, know that there is a lot of wiggle room to find your favorite spice combination. I will also add that if you don’t like butternut squash, I have also recently discovered broccoli makes a great substitute to change things up.
I’ve included a photo collage below of the step-by-step process as well as the nutritional information for my favorite bouillon cubes.

Perfect in a mug on a cold winter day!
Creamy HMR Butternut Squash Soup
- 1/2 cup diced onions
- 2.5 cups chopped butternut squash (I cheat and buy it pre-peeled and chopped)
- 1/2 tsp Penzeys Bavarian seasoning (yes the same seasoning from my Shepherd’s Pie recipe)
- 2 cups water
- 1 bouillon cube (I am sharing a picture of my favorite brand Massel below!)
- HMR Chicken Soup packet
Saute onions in a pot over medium high heat until they start to become translucent, about 2-3 minutes. Add squash and seasoning and mix, cook for another 2-3 minutes to allow some browning of the squash and toasting of the spices.
Add water and bouillon cube. Cover and bring to boil. Reduce heat to low and let simmer as long as you can stand it (I’ll admit I only let it go 15-20 minutes). Your goal is to have softened the squash and let the flavors steep.
Put contents of pot into blender and add soup packet. Be really careful when blending hot liquids! I have a Vitamin which has the ability to vent on top to release the steam. Blend until smooth and creamy.
This makes a MASSIVE portion – I usually make it and pour some in a mug to enjoy while grading or doing meal prep. I keep going back to refill my mug until it’s all gone. It keeps me warm, full, and out of trouble. In fact it’s what I’ll be enjoying tonight while I grade and pack for my school trip this weekend!

Visual steps for making HMR Diet Creamy Butternut Squash Soup
HMR Diet Hacks – Easy and Filling Healthy Solutions Combos
I am told some of my recipes are a little complicated. That part of the joy of the HMR Program is how simple it is. And I agree. Not about my recipes being complicated, but about the simplicity of the HMR Diet. And while I started this blog initially for accountability and also to record some of my creations to reference later, I don’t take time to write up some of the simple hacks that keep me full and help me meet my minimums.
So here are a few of my current Healthy Solutions entree & veggie combos. I will often add salt and pepper and maybe some hot sauce or roasted garlic powder to help extend the flavors, but otherwise it’s pretty basic.
I would love it if you could share some of your favorite combos as well – I am truly inspired by other people’s ideas and success, and sharing it as a comment allows others to be inspired by your ideas as well!
Cauliflower Rice – This is a staple in my household. I buy frozen bags and also fresh ones. Just about every store and brand has their version, just double check to make sure there are no added out-of-the-box ingredients.
- Steam up a bag of cauliflower rice, cook up a Chicken Creole entree, mix together and add some creole seasoning and/or hot sauce.
- Also great with the Mushroom Risotto entree. Sprinkle with some truffle salt if you want to get fancy.
- Cook it up on the stovetop and use salsa instead of water or cooking spray – let the salsa reduce in the rice (the liquid cook off) and you have a spicy rice perfect to serve under a Chicken Enchilada entree.
Zucchini – Spiralized as noodles (again fresh or freezer aisle) or just cut using a veggie peeler or slicer, this vegetable is versatile and takes on the flavor of many entrees.
- Toss with some tomato sauce and Italian seasoning and serve under the Lasagna or Ravioli entree.
- Steam it up and mix it in with the Penne Pasta and Meatballs entree.
- Slice it thin like noodles and insert it in the middle of the Lasagna entree before baking.
Jicama or Carrot or Cucumber Chips – these are great crunchy snacks that are perfect to dip in salsa. Or how about blending a 5 Bean Casserole entree with some salsa. I like measuring out the vegetable slices into one cup portions – although I usually use two with my bean dip!
Almond Joy Hot Chocolate
I have fallen into a morning routine. Every morning I turn the kettle on and fill a giant Contigo with a white herbal tea. I have a second Contigo where I pour a hot shake. And then I blend up a cold shake for my morning commute. Then throughout the day, regardless of how hectic it is, I have several warm drinks I can sip on. My cold morning shakes all week have been the Decision Free Butterfinger Shake (but made with the 120 Vanilla since I am in Healthy Solutions and only about 6 pumps of syrup because my sweet tooth has subsided).
And my hot shakes have been a take on an Almond Joy bar. I like mixing up the syrups and using the extract because the flavors build on each other. If you like it less sweet, I bet you could easily use coconut extract instead of syrup, but I haven’t tried it personally.
Please note that my ratios are for a large Contigo thermos that holds 24 ounces, adjust proportions accordingly if you need a small fit.
Almond Joy Decision Free Hot Chocolate
- One HMR chocolate shake
- 4 pumps Torani sugar-free Almond Roca syrup
- 3 pumps Torani sugar-free coconut syrup
- 1/4 tsp almond extract
- 20 ounces hot water
Blend all ingredients together and enjoy! I find blending super fast at smoothing it all together without lumps, although you can use whatever method you use to make hot shakes.
Cauliflower Tortilla – a #HealthySolutions experiment

I was watching Top Chef this week and was impressed with a challenge where contestants had to replace an ingredient with cauliflower. It was fun to watch because cauliflower is in my Healthy Solutions box and I was inspired to play…
The Internet is full of cauliflower “bread” recipes, most of which require oils and cheese, which aren’t in my HMR Diet Healthy Solutions box. And thus I was motivated to create my own.
I’m still playing around with this, but after several variations (I’ve eaten a LOT of cauliflower this week), I have a version that makes a pliable wrap/tortilla-like product that can easily hold other ingredients.
One note of caution if you are a volume eater is that by processing the cauliflower in this way, you are making a low-volume food that may not be as filling. I try to keep my low-volume foods to a minimum so that I can stay full, which is why although this is “in the box,” I won’t reach for it all the time.
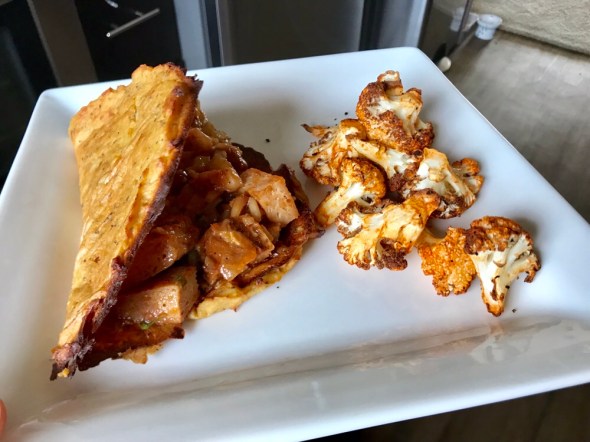
- HMR Healthy Solutions cauliflower tortilla filled with a stir-fry of cauliflower rice and the HMR BBQ Chicken entree (only part of the entree – saved some filling for later) served with a side of air-fried buffalo cauliflower. I declared the day “Cauliflower Day” 🙂
I have included pictures of the steps at the conclusion of this post to help with visualization since it’s a bit more complicated than most recipes I’ve posted.
This recipe uses something called aquafaba. Its the water that chickpeas are cooked in (there’s a chemical reaction that occurs giving it a viscosity that works like egg whites). You can just open up a can of chickpeas and take a tablespoon of this water/aquafaba. It serves as the binder for the ingredients.
Final note – the soup gives more than enough salt for this recipe. After several trials, I’d recommend checking any flavorings you add do not have additional salt in them (I used Penzey’s seasonings but you could change things up).
HMR Healthy Solutions Cauliflower Tortilla/Wrap
- 4 to 5 cups of cauliflower florets
- 1 HMR Chicken Soup
- 1 tbsp aquafaba
- 1/4 tsp Penzey’s Tuscan Sunset
- 1/4 tsp Penzey’s Roasted Garlic
- Preheat over to 350 degrees. Steam cauliflower in your favorite method. I just throw a tablespoon of water and the cauliflower in my large Pampered Chef Micro-Cooker and microwave for 5 minutes. Let cool so you can handle it.
- Use a food processor to blend it. You could also mash with a potato masher. I will warn you that I tried making a version with pre-riced cauliflower and it did not stay together very well – so definitely start with florets and get them nice and smooth.
- Scoop the cauliflower into cheesecloth and squeeze out as much liquid as you can.
- Add remaining ingredients to the cauliflower and stir to combine.
- Spread evenly on a baking pan either lined with parchment or a silicone baking mat. I actually would make three smaller tortillas next time, the larger one was too big and didn’t crisp as well in the middle.
- Bake for 30 minutes. Check doneness. Mine were still soft in the middle but had browned on top, so I used a spatula to flip them over and baked for another 10 minutes. Baking times will vary based on how big and how thick you make them as well as your oven’s calibration.
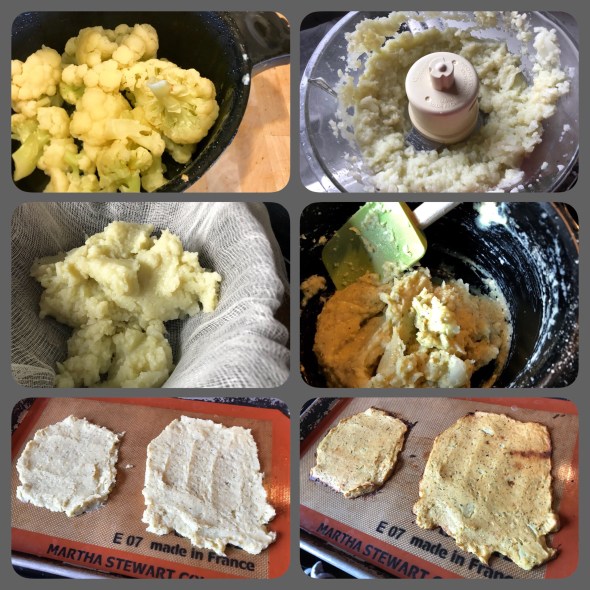
Making HMR Cauliflower Tortillas
HMR Healthy Solutions Shepherd’s Pie
One of the lessons I learned in my weight loss journey has been the bigger you cast your support net, the easier it is to stick with a weight loss program. From my original Core class starting our own Facebook group to finding fellow health-seekers to follow on networks like Instagram, from having conversations with friends and loved ones about what is supportive for me to seeking out like-minded individuals in my community, I have cast a very large net. I am also in a number of social media groups where I also find support and inspiration. And today’s recipe came from such a group – where a photo of a shepherd’s pie inspired me to play.

The concept itself is very simple. Mash some cauliflower and spread it over an HMR Lentil entree and bake. I played around with it a bit and would encourage you to do the same. I’ll include a list of ingredients I used at the end, but you should have fun with it and try different profiles. And if you really hate the lentils, I bet this would also be awesome with the chili entree!
For starters, I don’t fancy the lentil entree plain. So I added some salt, pepper, Penzeys Bavarian spice blend, and a dash of red pepper flakes. Mixed in two lentil entrees and spread evenly along the bottom of a silicon pie pan.
Then I steamed a bag of frozen cauliflower. There were five cups of cauliflower in the bag. After it was reasonably soft (about 5 minutes in the microwave), I drained the cauliflower and put it in the food processor. I added HMR-approved butter seasoning, smoked paprika, and Penzeys roasted garlic. Then turned on the food processor. I added fat-free vegetarian broth to help make it a thick but creamier consistency (you only need a couple of tablespoons – I recommend adding only one tablespoon at a time to avoid making it runny!).
I put the creamed cauliflower in a pastry piping bag. Because I felt like it and for no other reason. But it did allow me to make a fun spiral design and create a consistent layer relatively easily. You could also just spoon and spread the cauliflower on top.
Bake for 20 or so minutes until the cauliflower has started to brown and has a light crust. You could continue baking, or broil to brown the top more to increase the texture variables.
I let my pie rest overnight in the refrigerator, which made for easy portioning in the morning. Half of the pie is an entree and 2.5 cups of vegetables (and very filling!) but you could portion it into quarters or have the whole pie if you wanted!
Ingredients I used: 2 HMR Lentil entrees, 1 5-cup bag of frozen cauliflower, salt, pepper, red pepper flakes, Penzeys Bavarian seasoning, Penzeys roasted garlic, smoked paprika, Molly McButter, one vegetarian bouillon cube made into broth
HMR Healthy Solutions: Butternut Squash Beef Stroganoff
After my first Core class last week, I went to Sprouts to stock up on vegetables and fruits to bulk up my meals. It was going to be a stressful couple of days and I knew I didn’t have time to prep a lot of ingredients, so I went in search of pre-cut produce to save some time. And I discovered spiralized butternut squash!
Now I have a spiralizer at home but I’ve never thought to use it on butternut squash! So I had to pick up a package to try as I was struck by inspiration.
I’ve made the following recipe a few times this week. I like the texture of the squash to be a little crunchy, so cook longer if you want softer noodles.
Also, if you are extra hungry, you can double everything but the entree for extra bulk and minimal calories (I’ve done both!).
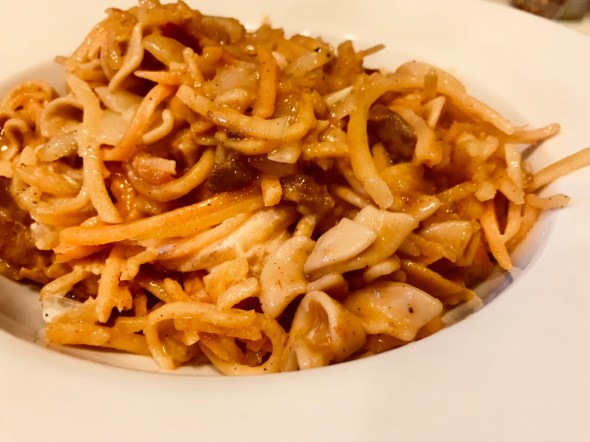
Butternut Squash Beef Stroganoff
- HMR Beef Stroganoff Entree
- 1 cup butternut squash noodles
- 2 tbsp chopped onions
- 1/8 to 1/4 tsp smoked paprika (depending on how strong you want it)
- 1/2 tbsp FF sour cream
- Water
- Salt and pepper to taste
Heat sauté pan to medium high and cook chopped onions using either a spritz of cooking spray or water for 1-2 minutes until they start to soften. Add noodles, paprika, and a sprinkle of salt and pepper.
Stir and cook for 3-4 minutes. You will want to add a little water to keep things from sticking (I keep a little bowl with a tablespoon in it nearby while cooking to add as needed without adding too much).
Add Beef Stroganoff entree and mix well. Cook for another 2-3 minutes. Turn off heat and fold in sour cream. Serve and enjoy!
Bulked up Beef Stroganoff an #HMRDiet Healthy Solutions recipe

This is an easy way to get three servings of vegetables into the day while enjoying a delicious and satisfying meal.
- HMR Program Beef Stroganoff entree
- 1/2 cup diced onion
- 1 sliced garlic clove
- 1 & 1/2 cups sliced Baby Bella mushrooms
- 3 cups fresh spinach
- Chicken broth
- Smoked paprika
- Truffle salt (or your favorite salt)
- Fresh ground pepper
- 1 tbsp sour cream (whose nutritional data falls within HMR condiment guidelines)
Sauté onion and garlic in a splash of chicken broth (I use the broth in lieu of cooking spray in the dish so you will want to keep it nearby to pour a splash in if things get dry).
Once onions start to soften, add mushrooms as well as paprika, salt, and pepper (those will all be too taste – I tend to pour a little heavy!). Sauté for one to two minutes. Once mushrooms start to soften, add spinach.
Once spinach starts to wilt, add HMR entree. Toss everything together and cook for several minutes to allow flavors to meld.
Remove from heat and fold in sour cream. Serve and enjoy!
Peanut Butter Hot Chocolate – the HMR Diet hot shakes continue!
It’s cold and rainy here in California which means I am continuing to experiment with hot shakes. I tried to make something a little less sweet this time around while still being rich and filling.
Using unsweetened cocoa and PB2 gave the shake a deep mouthfeel while keeping the overall sweet level down. Perfect to sip while grading research assignments or enjoying a good book.
I used a travel Aerolatte milk frother for my hot shakes. It’s easy to carry, clean, and make clump-free shakes. But this could easily be done with a whisk or a blender (just be careful with pressure that can build making hot beverages in a blender!).
Peanut Butter Hot Chocolate
- 1/2 tbsp PB2
- 1/2 tbsp unsweetened cocoa
- 1 HMR chocolate shake
- 14 oz hot water
Pour hot water in a large mug. Slowly pour in shake powder while frothing/whisking. Do the same with PB2 and cocoa. Make sure to pour powders in slowly to reduce possibility of clumping. Enjoy!
